But “Intelligent Homes” have been around for years, just that they were often electro-mechanical devices. Years ago, my driveway featured an electric eye to detect cars; one house used 24v DC to drive relays for the 110v AC lights, etc. Today we can use electronic devices. Same concept.
When I decided to re-insulate this house, I used that opportunity to run Ethernet throughout. All wires connect to a central switch with three WiFi access points throughout. That means I can install IP cameras anywhere and plug into my Local Area Network. So let’s look at some of these.
Cameras are everywhere….
Most people think of Cameras as “Security” and yeah, it does that and a lot MORE! Being able to view your house remotely is a big plus.
But… if it’s hard to use, it becomes a Big Minus!
Amcrest WiFi Video Doorbell, AD110
Disclaimer: Amcrest offered me a manufacturer’s discount if I installed this device and wrote a review. I already had their exterior camera and wanted the doorbell. For their “discount” they get an expanded review, but I won’t go easy on them. This is a competitive market after all.
Pre-Purchase Review: The big seller for me was the retrofit design. No batteries; this plugs into the existing door bell wiring and uses the existing chime. Uses house WiFi, so no monthly service charges. Looked nice in pictures, so let’s try it. Here’s the Amcrest website. I ordered from Amazon.
Main door will get the bell. Side door has 2nd chime
Box as it arrives
First appearances are impressive. Doorbell kit is well thought-out. Center tool features a “Phillips screwdriver” with a flatter profile than standard American designs, plus a security torx tool for the bottom case screw.
Even includes a drill bit for the screw anchors. They seem to have anticipated what you might need and included it.
Bottom part is a Chime Kit (didn’t work with my chime).
The attachment bracket is sturdy metal (no plastic) with a nice finish. Overall workmanship is high quality.
Installation
To review this product, I will follow the installation instructions exactly as shown.
Step 1: Cut power to the system and Install the Chime Kit
Nutone LB-14WH Mechanical Chime
Chime Kit: Instructions are very clear. My Chime is a Nutone 14WH installed in the ceiling. It looked exactly like the pictures in the guide. Locate the FRONT and TRANS connections, these are the TOP and MIDDLE screws in the photo. Attach the chime kit to these terminal.
PROBLEM: There is not enough room to store the kit within the box. The connector sticks out the side. (see Arrow)
If there was a connector on the END of the kit, it would have fit.
But as you see, with the plug on the SIDE, there is no room. The wiring harness is 16″ long, so I could fine a spot behind the box inside the ceiling. So I removed the chime from the box and mounted the kit to the rear of the plastic bracket.
Mount the Chime Kit on REAR of Chime
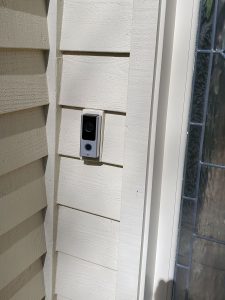
Step 2: Install the Door Bell.
Door Bell with included Pigtails
Door Bell: Instructions are also simple. To remove the faceplate I used a guitar pick (thin plastic tool) to unhook the sides.
I used a 32 GB micro SD card formatted to FAT32. You can also use the Amcrest Cloud ( I did not yet ) and I see Amcrest gives you the first year for free.
The solid copper doorbell wires are stiff and it’s easier to use the included pigtail wires.
Don’t mount it yet — you want to scan the QR code on the back after you install the app in Step 3. Might be a good idea so take a photo of the back plate and/or note the serial number (which is on the box also).
OK, Turn the power back on!
Format the SD card to FAT32
Step 3: Load the Amcrest Smart Home App.
I have an Android (Samsung 10) so it was easy to install the app from the Google Play store.
Pick a LONG and SECURE password and WRITE IT DOWN.
It’s hard to describe each step exactly but you want to add a device. I followed the instructions and it worked easily. Use your phone to scan the QR code when prompted. At some point, you have to press the RESET button. It’s on the rubber water guard next to the slot for the micro SD card. The Doorbell will talk to you during the install. Now you can mount the Doorbell on the bracket using the included security torx screw.
You’ll have to know your WiFi password for the 2.5 GHz signal (if you have 5 GHz, don’t use that connection). The Doorbell will tell you when it has established the connection.
Under Device Information I set the Chimes to Mechanical. However, it has no effect, the inside mechanical Chimes still do not work. The doorbell makes its own chime and you can set the Ring Tone to use and also the Volume.
Everything else seems to work quite well. Easy to replay recorded videos from the SD Card. Mic and Speaker work well. I was actually impressed. Total time to install was maybe 2 hours and that included time to take pictures and make notes. I cannot compare this product to other manufacturers.
One Other Snag: The Smart Home App found my other Amcrest 4K Dome Camera but I could not edit the settings and therefore could not view the camera with the Home App. I was told about this in advance and this function is not yet in the software. So for now I have two apps: Amcrest View Pro for the Dome camera and Smart Home for the doorbell. I hope they can unite this in the near future.
Conclusion
Amcrest Video WiFi Doorbell
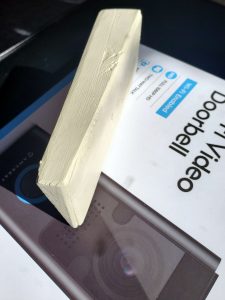
I made up a Wedge from Cedar (same material as clapboard) that is sloped in 2 axes: The lengthwise slope against the clapboard, allows the camera to be vertical; and the other wedge points the camera towards the visitors and away from the side wall
First Impressions
Higher build quality than I had anticipated. Nicely packaged with everything you will need. Instructions are easy and clear and logical. But I’ve got 30 years working with computers, would it be easy for the average person who understand SOME tech? I think so. I have not used other competitor’s products so can’t compare. So far, good value for the money.
Using the App: This is ongoing and I’ll post more here in the next days as I use it. So far, I like it!
Problems & Solutions
1. It didn’t work with my Chime (Nutone LB-14WH). Measured 17.9 vac at the unit. I reported this and am waiting for a reply.
UPDATE: Bryan B at Amcrest wrote to say that the latest firmware had the Digital and Mechanical Link Setting reversed. I set it to DIGITAL and it WORKS!
2. Chime kit will not fit inside the chime box. The connector sticks out the SIDE. If there was a connector on the END of the kit, it would have fit.
Wish List
1. Put Connector on SHORT END of chime kit. It will fit MORE installations then.
2. Adjustable Camera Angle: Because the the door bell is mounted on clapboard siding, the camera points too high. It’s also located away from the door so it needs to be angled 15 degrees to the side. Without being able to angle the camera LENS, I had to build an adapter plate to offset the entire Door bell unit.