It’s sad to discover, that “professional” builders can make mistakes as bad as this one. I hope that by reading this, you can learn to ask the right questions of your contractor. Don’t settle for excuses like “This is how it’s done“! Demand better!
No waterproofing under the glass so the wood rotted away.
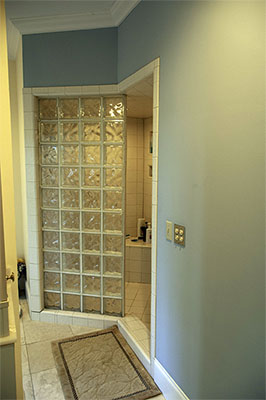
See the glass block? It’s leaning to the right because it’s collapsing into basement. The floor is spongy, YUCK. It started leaking days after the house was built.
No waterproofing under the glass. They set the glass on top of bare 2×4’s and sealed it with a bead of silicone. Would YOU, the homeowner, think it’s OK to have bare wood in the shower?
They did put a membrane under the shower tray but NAILED and STAPLED through the rubber. It leaked and rotted out the subfloor.
No waterproofing under the shower seat. The water leaked through the grout and rusted out the metal lath in the concrete. The seat fell off.
Also, do you notice there is NO DOOR separating the toilet (next to the shower) from the rest of the bath and bedroom? I’m going to add one.
CURBLESS. Yes, discard the trip hazard. Make a flat floor that slopes gently to a linear drain on the back wall.
Thermostatic mixing valve and Adjustable Shower Bar for short and tall bathers.
All water pipes are insulated.
CURBLESS. No tripping.
Flat Floor slopes gently to linear drain on back wall.
Travertine Stone provides an elegant appearance and matches the existing Travertine Floor throughout bathroom.
You MUST be the champion of your own house and never permit shoddy workmanship like this.
The builder will never admit it’s “crap”, if you don’t speak up.
And… I had to rip it all out to fix it right.
The subfloor was rotted away
The shower seat lifted off easily. Water leaked though the mortar and rusted away the metal lath.
This is what's left of the floor joists. They will get repaired by sistering on new wood.
This is one of my favorites. You must always watch to see what is done “Behind the Scenes”.
For Lack of a Downward Tee, he used an Upward Tee
The goal is to run hot water from the overhead pipes DOWN to the mixing valve. You can see the Rube Goldberg way it was finally done.
I figured he was all out of “Downward Tees” and had to use an Upward Tee with TWO 90 deg elbows (and you wonder why we had low water pressure?)
Robert Hyduke deduced the Plumber knew that Hot Water rises so he was giving it a Head Start. Plus Upward Tees are cheaper. (yes, this is sarcasm)
Or maybe he was paid by the number of elbows he used?
The green on the copper is his failure to wipe off the flux.
The insert shows how we replaced 2 elbows with a downward Tee and a single 45 deg elbow. Fewer Joints = Less Resistance = Less Noise = Greater Pressure
Yes, the Open-Plan Bathroom. As in “NO DOORS”!!?
This was the first house I had ever seen without a door to the bathroom. How many readers out there have no bathroom door?
And it’s easy to fix. I’ll cut a hole in the wall behind the old mixing valve (see red rectangle) and insert a 36″ wide pocket door. This will separate the toilet and shower from the rest of the bathroom.
Many people dislike pocket doors, but it’s usually because the hardware is cheap (builder grade) making the door hard to slide. If you pay a few bucks more and buy Commercial Grade, you get a quality ball-bearing mechanism that moves with a fingertip. I bought the 200PD from Johnson Hardware
I can remove this wall and insert a pocket door and new wall in its place.
Here's the pocket door in place
Door closed showing the Commercial Rollers. A glass transom light will go above the door.
While it’s apart — FIX IT NOW.
I never understand why people build showers with a single overhead light. The KGB Interrogation Lamp! I always put in two lights at least: Reduces shadows and makes a better appearance. And fix the lousy switch arrangement.
This switch design looks like in belongs in a hospital
Do the switches on the left look good to YOU?
Yes, I know the NuTone fan, light and heater came with that ugly metal cover plate and cheap switches but you DID NOT HAVE TO USE IT.
LET’S FIX IT!
First, Let’s put in an electronic fan control. Pick a run time, hit the button and the fan shuts off after your selected time.
The switches on the far right control the Room Light (TOP) and Night Light (lower)
The Center one controls the Shower Lights (TOP) and the Room Heater (lower)
Smarter switch layout with electronic fan timer
Time to fix the Damage caused by careless Workmanship
You cannot FIX rotten wood. Best you can do is to SISTER good wood alongside the bad.
First, I had to treat the damaged wood to remove any mold and kill the awful smell. Two weeks of air-drying helped.
Next, I’ll install blocking headers under the floor. This cross-bracing not only stiffens the floor for tiling, but provides an anchor for the original wall-sole plates that rotted away.
Lastly, the new joists have a 1/4″ per foot slope cut into the top. This makes the entire floor slope to the rear where we’ll install a “Linear Drain” along the back wall.
The new Subfloor will be 3/4″ plywood glued and screwed to the floor joists. Everything we do is designed to create stiffness in the structure.
Sistering new joists alongside damaged joints for strength
New Building Techniques
We are going to use new material and methods to make sure the shower lasts a lifetime!
Builders and Politicians don’t hang around long enough to see first hand the failures of their work. If your shower fails after 5 years, the builder won’t return to do a post-mortem and update his construction methods. Indeed, many builders are just afraid to try anything new. It’s understandable: Continuing education takes time, new materials need new skills and it might even cost more. Also, you the homeowner, must see the advantages. Popular TV shows rebuild an entire house in a month. If only the TV program showed all the failures.
A New Mindset
This shower — like all projects — asks 3 questions:
Is it Attractive?
Does it fit the architectural design of the house? Do you Smile when you see it?
Is it easy and fun to use? Can family members tall and short use it equally well? Is it wheelchair accessible? Barrier-Free?
Is the lighting bright without shadows?
Is it QUIET when you run the water? Do you hear it from other rooms? Reducing Noise is important.
Is there good ventilation with a timer so you don’t have return to turn off the fan?
Is it Maintainable?
Is the design Robust? I see showers with flimsy little seats, so what if that seat breaks?
Are you using a waterproof design that cannot leak? Sorry, but I cannot understand shower liners. To me it’s like putting a kiddie wading pool in your shower. It will always fill with water that penetrates the grout.
What if the mixing valve fails? Is there a way to replace it without tearing the shower apart?
Is it Easy to Clean and Keep looking like New?
Grout is hard to keep clean, it is porous. If you have 1″ tiles on your floor with 1/8″ joints, then 21% of the floor area is mortar (grout) and NOT tile. So our goal is to reduce the number of grout lines. Fortunately, the current trend in large format tiles helps that problem a bit.
If the structure of the shower is not stiff, you can get cracked grout and seams will need re-caulking.
Shower walls with intricate designs are a wonder to me. Who cleans those intricate little bits?
What’s NEW Here?
To make it attractive and easy to use, we’re installing a Linear Drain. Instead of a single small drain in the center of a funnel-sloped floor, the Linear drain goes against the back wall. This changes everything: The floor is now a Flat, Sloped Plane that directs the water to the wall. We can use Large tiles on the floor and so have fewer grout lines, AND we don’t have to use a Curb anymore and the shower floor will be flush with the floor of the room. Barrier-Free! No Trip Hazard!
Most shower valves are soldered in place during construction. If the valve fails, you often have to tear the shower apart. Instead, we’ll use a Rough-in Fixture that works just like a light socket. The Mixing value just bolts into place. If it ever fails — just as you unscrew a burned-out light bulb, you just unscrew the valve and insert a new one. Yeah, it added about $80 to the total cost.
Waterproofing. Remember? Bad (actually NONE) waterproofing was why this shower failed. I’m installing Schlüter Kerdi Membrane over concrete board. I’ve done this with other showers before and it will NEVER leak.
ADA: The Americans with Disabilities Act has a set of standards specifying optimal heights of fixtures and grab bars in showers. It’s not required where I live, but it seems good practice to follow these guidlines. So I did.
Instead of the typical center drain, I'll use a long Linear drain that runs along the back wall.
A Rough-In for the Mixing Valve.
A waterproofing membrane ensures no water getrs past the tile.
Insulate Pipes, Walls while you can! Keeps water Hot and cuts Noise.
Pipes insulation keeps the water hot and cuts noise
Why don’t people insulate pipes and walls?
The old shower was Noisy. While the walls are exposed, this is your chance to make it QUIET.
Use 45 deg copper elbows with when possible. You cut water resistance and you cut noise.
SEAL all cracks with foam insulation. You can see some of it on the upper left of the picture.
Insulate ALL the pipes — Hot & Cold — everywhere.
Insulate all the walls with rockwool insulation. I’m working on the bare wall in the photo.
Mount fixtures over a noise-isolating membrane and I use rubber-gasketed screws, too.
Safety Considerations
The ADA standards state that the mixer valve should no higher than 48″.
Inserted 2×8 blocking in the walls for the option to install Grab Bars with a maximum height of 36″.
3/4" Plywood Glued and Screwed onto joists
Finishing the Subfloor and Cement Boards
It’s always the little details that matter. Skip them and you have a mess later. (hole in rear is exit for linear drain)
Glue and Screw the plywood subfloor is to the floor joists. Yeah, they actually make a Subfloor adhesive. The screws are Torx head, 2″, coated flooring screws. They are tough little buggers.
Likewise, you have to use special coated screws on the Cement board. Drywall screws are not strong enough and the cement will corrode them.
The cement board is adhered to the plywood with both Modified Thinset (it has some latex in it) and flooring screws. Don’t skip the thinset, it makes the floor stiff.
Today there are many products you can use in place of Cement board. I just like the heavier mass of the cement board, but it’s a personal choice and trade-off.
Installing the Linear Drain (Channel Body)
Installing the Linear Drain Housing
More little details… To install this drain, you must use UN-Modified thinset (No Latex). I use a 1/4″ square-notched trowel.
You set the frame in first – Check it’s level
Apply a layer of thinset over the frame and Insert the Channel Body (drain). Make sure it’s level too. Top of channel should be level with Subfloor.
In case you are wondering… Yes, I have access to the plumbing from below and have already dry-fit the 2″ PVC for the drain. Once you mortar the drain in place, it’s NOT coming out again! So make sure the plumbing works!
Making it WATER-TIGHT.
Kerdi Membrane on Walls & Floors
The Schlüter Kerdi Membrane is 1 meter wide. So it’s easier just to use a metric measuring tape when installing it.
On seams, you either overlap by 2″ (50 mm), or butt-join and use a 125mm tape overtop the seam.
Important to use the Un-Modified Thinset. To help maintain the warranty, I just use the Schlüter branded thinset called “Set”.
The cement board will suck the moisture out of the mortar so it’s best to wipe the board with a wet sponge first. It’s not hard to do, but it takes time.
The Shower is Now Water-Tight.
Membrane around the Mixing Valve Housing
The solid wood pocket door matches rest of doors in house
FINISHING TOUCHES
It feels GOOD to be adding the finish details after so many months of tearing things apart.
WE FIXED IT: No more Open-Plan Bathroom!
The original house had NO DOOR separating the Toilet & Shower Room from the bedroom. There is one now!
Solid doors are Heavy and this one floats on commercial hardware with 8 ball-bearing wheels.
Used heavy chromed door pulls from Baldwin. Look good but also large enough for a man’s fingers to operate.
Close-up of Chromed Door pulls
Hey, the Tile Arrived !
After searching about 10 distributors trying to find travertine, we ran into the best customer service at the Tile Shop in Knoxville, TN. In one day we confirmed the quantity we needed, placed the order and they had it loaded it onto a truck at the warehouse in Virginia. A few days later a 40-foot Holland truck arrived. It won’t get down our narrow road, so we dropped it off at a crossroads. Neighbors helped us ferry the 1550lbs of stone to the job site. Of course it was below freezing outside!
Glass Transom
The idea to to make to space above the door appear open when the pocket door is retracted. I found Fab Glass and Mirror online and ordered a custom-cut sheet of 1/4″ tempered glass. 14 days later the glass arrived in the best packaging I’d ever seen. My tolerances were tight and the glass was cut within 1/16″. Used an oscillating multi-tool to cut a slot in the crown molding and the glass fit PERFECTLY.
Time for Travertine
The Romans built the Colosseum from Travertine. I figured I could use a little for my shower. Yes, it’s soft, must be sealed and takes a bit of care, but the subtle, warm tones are worth it.
Travertine is fun to work with. These tiles are 12 x 12 x 3/8″ and they are heavy, just under 6 lbs each.
Started at the ceiling. No, they won’t fall down. Thinset is mixed a bit stiff and applied “backwards”; than is, I back-butter the ceiling first and then apply thinset to the tiles using 1/2″ square-notched trowel. Try troweling mortar over your head once and you’ll see why I do it this way. On the walls, it’s back to normal, with troweling thinset on the walls and back-coating the tiles.
Here I’m using the Raimondi tile leveling system, to prevent lippage. Plastic spacers (1.5mm or 1/16″) go between and under tiles. The red wedges pull adjacent front surfaces tight together and hold them there while the thinset cures. There are many similar products you can use, but these are high quality (from Italy) and my local contractor’s supply carries it in stock. Once the Thinset has cured you can snap off the upper plastic bits with a mallet.
The Greenspacers help keep the corners square.
The Bluepainter’s tape is my coding system that follows the layout drawings. Since travertine is a natural product with significant variations, I spread the tiles out on the floor, then piece together a pattern that looks best. Then they get sequentially numbered and installed in order.
The LED ceiling lights are sealed units designed for wet areas. 3500K to highlight the stone.
The hardest work is laying out the design properly. Mostly you start in the center of the room as is traditionally done. Notice all walls Start at the second row (except the back row which has the linear drain). This is because the floor slopes to the rear and I want the tiles to sit on top of the floor which I’ll install last to prevent it from being damaged. Then fit all the custom-cut pieces on top. The walls follow an installation order as well; the logic being you don’t want to look into a grout joint at a corner.
Walls start on row #2, first row installed once Floor is done
Installing Glass Panel on Knee Wall
Some tiles take time to cut
Thermostatic Mixing Valve mounted by entrance
Knee Wall with Glass Panel
The new tile leveling system helps prevent lippage
Custom-cut trim pieces on Knee Wall
Adjustable Shower bar with removable Shower Head
1/16" (1.5mm) grout joints require some careful planning with precis layout
The shower room has its own heater, so closing the door helps in Winter.
The reward from months of effort.
I like the way the pocket door "disappears"
View of Towel Bar from within Shower
Heated Towel Bar
Hot Towels. Why put up boring towel bars when you can have heated?
Running it for about 2 hours keeps room warm and towels dry. Uses 300w. So about 3 cents an hour.